Have you ever wished for a few extra seconds to fine-tune your iPhone photos or wanted a convenient way to include everyone in your group shots? Your iPhone camera has you covered with its built-in timer feature, available on all models, from the latest iPhone 15 Pro Max to earlier versions.
In this article, we’ll walk you through the straightforward process of setting the timer on your iPhone camera so you can effortlessly capture those ideal moments without missing a beat.
What is the iPhone Camera Timer Feature?
The iPhone camera timer feature introduces a delay between pressing the shutter button and taking the photo. This functionality helps reduce camera shake and gives you time to get into the frame or adjust your shot. Whether you’re taking group photos or selfies or want to stabilize your Camera, the timer feature can significantly improve your photo quality.
Setting Up iPhone Camera Timer
Hidden within your iPhone’s camera settings, the timer function offers a brief delay between pressing the shutter button and capturing the photo.
While the Apple Watch camera app is an alternative, it can sometimes interfere with your shot composition. Here’s a step-by-step guide to setting up the timer on your iPhone camera:
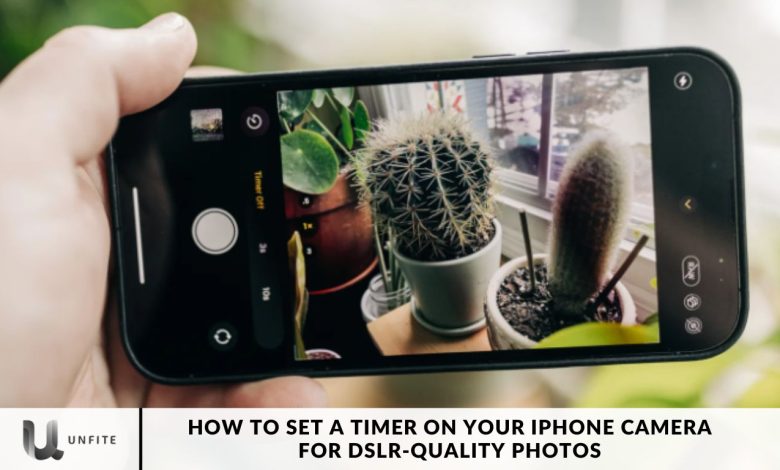
- Open the Camera App: Launch the Camera app on your iPhone and tap the upward arrow at the top center of the screen.
- Access Timer Settings: Find and tap the Timer button in the menu above the Shutter button.
- Choose Timer Duration: Select either a 3-second or 10-second timer duration. For this guide, we’ll we’ll choose the 3-second option.
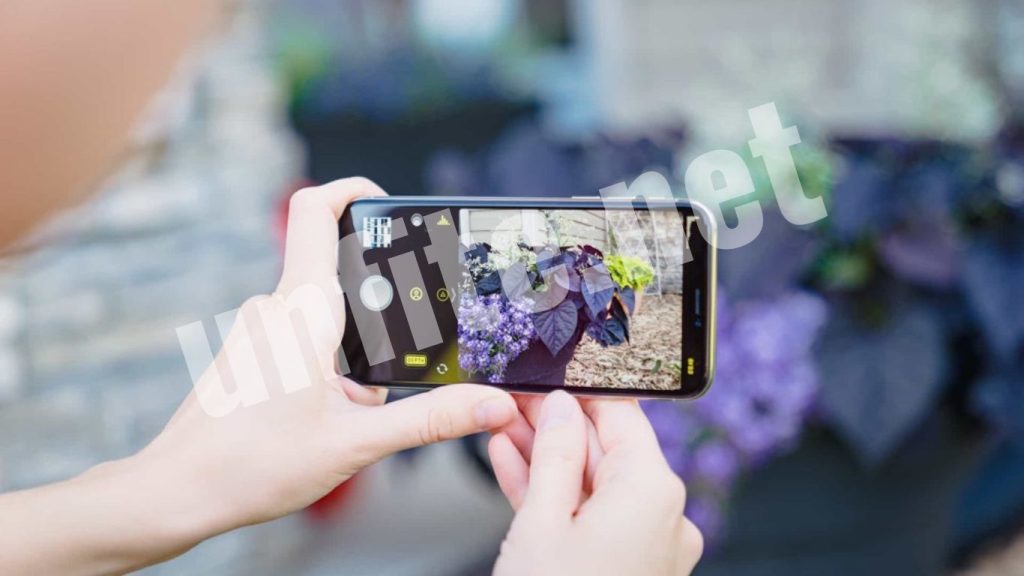
- Position Your iPhone: Place your iPhone on a stable surface, use a tripod, or hold it firmly to achieve your desired shot composition.
- Initiate the Timer: Tap the Shutter button to start the timer countdown.
- Capture the Moment: When the timer reaches “1,” the shutter will automatically release, capturing your photo.
Benefits of Using a Timer in iPhone Camera
Group Harmony: Prepare everyone for the group photo, reducing the risk of anyone being left out of the frame.
Stability & Clarity: Improve photo quality by positioning your iPhone on a stable surface or using a tripod, minimizing shake and enhancing clarity.
Better Selfies: Enhance your selfies by setting up the shot, finding the ideal angle, and posing comfortably, giving you time to perfect your look.
Creative Freedom:
- Take your time to experiment with unique compositions.
- Adjust your framing.
- Capture candid moments without the pressure of rushing.
Set The iPhone Camera Timer & Take The Photo.
The timer on your iPhone camera introduces a delay between pressing the shutter button and the photo being taken, allowing you to prepare your shot without any rush.
Choosing the Right Timer Delay:
3-Second Delay: This is ideal for scenarios where you don’t need to be in the shot. This short delay helps reduce the camera shake that might occur when pressing the shutter button. By the time the timer triggers the shutter, any potential movement caused by you pressing the button will have settled.
10-Second Delay: This longer delay is perfect for group shots where you want to be included. It provides extra time to join the group and get into position comfortably.
Tips for Successful Group Shots:
Prepare the Group: Make sure everyone is ready before the photo is taken. To avoid any closed-eye mishaps, ask everyone to keep their eyes closed until it’s time to open them for the photo.
Arrange the Subjects: Leave a space for yourself in the group composition so you can easily fit in when the timer goes off.
Using the Timer:
Set Up: Once the timer is set, ensure your subject is ready and the frame is composed correctly. Press the shutter button to start the countdown.
Burst Mode: When the timer triggers, the iPhone camera uses Burst Mode to capture ten photos. The app will select the best shot based on clarity, but you can review all ten pictures in the Photos app and decide which ones to keep or discard.
HDR: Shoot in Difficult Lighting Conditions
You might have noticed the HDR badge in your Camera app and wondered about its purpose and optimal use. HDR, or High Dynamic Range, is a feature that enhances your photos by capturing three images at different exposures and combining them to create a single, well-balanced photo. This can be particularly useful in challenging lighting conditions, such as very bright or dark environments.
Using HDR:
Enable/Disable HDR: If HDR isn’t your preference, you can turn it off by tapping the HDR badge in the Camera app. Alternatively, you can set HDR to Auto, allowing the Camera to decide when HDR is beneficial based on the scene.
Dual Photo Capture: Your iPhone automatically takes both an HDR and a non-HDR photo. In the Photos app, you can identify the HDR version by the HDR badge in the top left corner of the image.
Manage Photos: If you prefer not to keep two nearly identical photos, go to Settings > Camera and turn off the Keep Normal Photo toggle. This will ensure only the HDR photo is saved.
Use the volume buttons as your camera shutter.
When Steve Jobs unveiled the iPhone in 2007, he famously declared that it would not feature a physical keyboard, much to the dismay of many smartphone users at the time. Instead, the iPhone introduced a groundbreaking touchscreen interface that could adapt to various functions as needed.
While this touchscreen innovation was revolutionary, it also made some everyday tasks, like taking a photo, a bit more challenging. Holding your phone steady while trying to press the shutter button on a touchscreen could be tricky.
Luckily, there’s a simple solution to this common issue:
Use the Volume-Up Button to Take Photos
This feature is enabled by default, though many users may need to realize it. Pressing the volume-up button takes a picture, making it much easier to snap photos without awkwardly tapping the touchscreen.
Bonus Tip: Press and hold the volume-up button on your iPhone to start recording a video. Release the button to stop recording.
How to Set a Timer on Your iPhone Camera
Follow these simple steps to set the timer on your iPhone camera and start capturing DSLR-quality photos:
Open the Camera App
Launch the Camera app on your iPhone. You can find the Camera app on your home screen or by swiping down on the screen and using the search bar.
Access Timer Settings
Tap the upward arrow at the top center of the Camera app interface to reveal additional settings. The Timer button is located in the menu above the Shutter button.
Choose Timer Duration
Tap the Timer button to choose between a 3-second or 10-second delay. For most situations, the 3-second option is ideal, especially if you’re setting up the shot and don’t need to be in it. If you’re you’re taking a group photo and need extra time to join the scene, select the 10-second delay.
Position Your iPhone
Place your iPhone on a stable surface, such as a table or tripod, to ensure a steady shot. If you’re you’re holding the phone, keep it as constant as possible to avoid any unwanted movement.
Initiate the Timer
Once you’re you’re ready, tap the Shutter button to start the timer countdown. Once the timer reaches zero, the Camera will take the photo automatically.
Capture the Moment
As the timer counts down to “1,” the shutter will trigger, capturing your photo. Before you start the timer, make sure everyone is ready and that your composition is set.
Tips for Using the iPhone Camera Timer Effectively
- Check Lighting Conditions: Ensure you have adequate lighting before setting up your shot. HDR mode can help balance exposure in challenging lighting conditions.
- Use a Stable Surface: For the most explicit photos, place your iPhone on a tripod or stable surface. This reduces the risk of camera shake and ensures a sharp image.
- Frame Your Shot: Take a moment to adjust your framing and composition before starting the timer. Use the grid lines in the Camera app to help align your subjects.
- Prepare Your Subjects: For group photos, remind everyone to stay still and keep their eyes open when the timer reaches its end. Leave space in the frame for yourself if you’re you’re joining the shot.
Managing HDR and Timer Photos
When using the timer, your iPhone camera may also capture HDR (High Dynamic Range) photos. HDR combines multiple exposures to create a well-balanced image, which is especially useful in high-contrast scenes.
Managing HDR Photos:
Identify HDR Photos: In the Photos app, look for the HDR badge in the top left corner of the photo. This indicates that the image was taken with HDR mode enabled.
Toggle HDR Settings: You can enable, disable, or set HDR to Auto by tapping the HDR badge in the Camera app. Auto mode allows the Camera to decide when HDR is needed.
Handling Multiple Photos:
Review and Select: After capturing a photo with the timer, if HDR is enabled, you’ll you’ll find both HDR and non-HDR versions. Use the Photos app to review and choose your preferred images.
Keep or Discard: If you prefer not to keep duplicate photos, go to Settings > Camera and turn off the Keep Normal Photo toggle. This will save only the HDR version.
Frequently Asked Questions
What is the iPhone Camera Timer?
The iPhone Camera Timer allows you to delay the shutter release for 3 or 10 seconds after pressing the shutter button. This helps reduce camera shake, gives you time to get into the frame, and is ideal for group shots, selfies, and steady shots.
How do I access the timer feature on my iPhone camera?
To access the timer feature, open the Camera app, tap the upward arrow at the top of the screen to reveal additional settings, and then tap the Timer button. You can choose between a 3-second or 10-second delay.
Can I use the volume buttons to take a photo when using the timer?
Yes, you can use the volume-up button to trigger the shutter when the timer is set. This provides an alternative to tapping the shutter button on the screen, making it easier to take steady shots.
How can I stabilize my iPhone when using the timer?
To stabilize your iPhone, place it on a flat, stable surface or use a tripod. This will help prevent any movement and ensure your photo is sharp and clear.
Does the timer work with Burst Mode?
Yes, when you use the timer, your iPhone will automatically take photos in Burst Mode, capturing multiple images in quick succession. This allows you to choose the best shot afterward.
What is Burst Mode, and how do I manage burst photos?
Burst Mode captures a series of photos quickly when the shutter is released. After taking a burst, you can go to the Photos app to review and select your favorite images. The iPhone automatically selects the least blurred image, but you can choose to keep or discard any of the photos.
How do I know if my photo was taken in HDR mode?
HDR photos are marked with an HDR badge in the top left corner of the image in the Photos app. HDR mode helps create a balanced photo by combining different exposures, which is especially useful in high-contrast scenes.
Conclusion
Mastering the timer feature on your iPhone camera is a simple yet powerful way to elevate your photography skills. It helps you capture DSLR-quality photos with ease. Whether you’re taking group shots or selfies or stabilizing your Camera for that perfect shot, the timer function allows you to create well-composed, clear, and sharp images without the rush of immediately pressing the shutter.
By following the steps outlined in this guide and experimenting with different timer settings, you’ll be able to take advantage of all that your iPhone camera has to offer. Combine this with other features like HDR and Burst Mode to further enhance your photos, ensuring that every moment is captured with the quality and creativity it deserves.